AECP Level 1 Final Challenge – Feminine Card Set

Hello everyone, I am so happy you have stopped by my website and blog today to see the latest cards I have created. The last 2 weeks have been super busy as I was working on 10 cards for my Level 1 Final Challenge final for the Altenew Educator Certification Program (AECP). I will be waiting on baited breath to see if I pass this level and move on to Level 2.

The Challenge consists of the following requirements:
1.) Create both a feminine and a masculine card set with 4 – 6 cards each.
2.) Card sets must be cohesive, can utilize various sentiments, and must utilize 3 of the concepts used in the Level 1 AECP Classes.
3.) Create packaging for each card set
4.) Use a recycled element for either the cards or packaging.

The concepts I chose from the Level 1 AECP classes for my Feminine Card Set are:
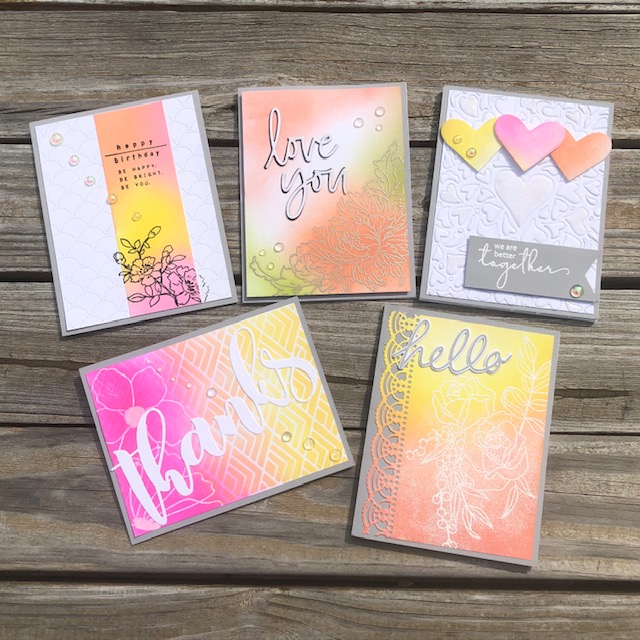
1. Easy Ink Blending Techniques. I used a number of techniques taught in this class by Amy Lee, in the cards I have completed. Such as inking entire backgrounds, gradient ink blending on individual card panels and through die-cut stencils, and emboss resist throughout the 2 card sets.
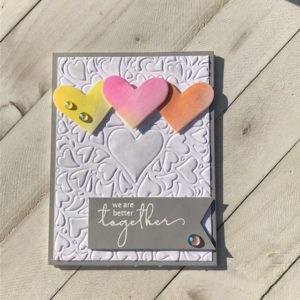
2. Easy Die Cutting Techniques. I used many dies to create my cards. I created die cut sentiments, created stencils with dies, used cover dies to add interest to backgrounds, and used dies to dry emboss backgrounds to create dimension.
3. Let It Shine. I truly enjoyed using the techniques used in this class to add shine and sparkle to my cards. You will see the use of embossing powders to add shine to all of the masculine cards for that very metallic cohesive look. I also used my favorite tool, my Wink of Stella clear glitter pen, to add sparkle to a number of cards as well. And of course I added sparkle and shine through the use of embellishments to amp up the bling factor.

It is time to share my AECP Level 1 Feminine Card Set with you. I hope this set will provide inspiration to you and spark excitement and joy in your life and those you create for. I also hope that I have successfully passed my AECP Level 1 Challenge and look forward to Level 2.

I wanted my feminine card set to embrace yellows, pinks and corals.  I designed 5 cards and used various techniques from the 3 concepts I described above, and all 5 cards utilized ink blending and gray accents for a cohesive theme.

For the first 2 cards I employed emboss resist with beautiful Altenew Dye Inks to generate these stunning backgrounds.  

The LOVE YOU card blending was completed with Altenew’s Canyon Clay, Rouge, Frayed Leaf and Fresh Leaf inks with a heavier concentration of color in the center of beautiful flower from the Altenew Majestic Bouquet Stamp.  The flower was heat embossed with Altenew’s Platinum Embossing Power to bring a stunning metallic shine to the card.  I popped the panel up with foam onto a gray panel and then glued it to an A2 card base. I then added these stunning clear drop embellishments to complete the look.  A helpful hint- remember to build up your ink in layers so that you avoid harsh brush marks.

The HELLO card used emboss resist as well, however, I chose to use white Altenew Embossing Powder for that wow factor.  The general rule with embossing is to use an anti static powder bag to prep your surface before you pour on your embossing powder.  For this card I wanted to forego that process so that I would have stray powder on the card panel.  When I applied the heat to the card it created this beautiful shimmery affect almost like tiny snowflakes around the roses from Altenew's Forever in Love Stamp Set.  Again, Altenew inks added the subtle elegance to this card.  I also used the Altenew Creative Edges Lace die cut to add an unexpected surprise as well as silver glitter cardstock for the hello sentiment.  I glued the die cut panel onto grey A2 size cardstock pane; and then onto an A2 card base.

My next two cards might be my favorite cards in this set.  The texture in the backgrounds make such an impact.  Again gray ties each of the cards together.

The WE ARE BETTER TOGETHER background employs a die cut but the embossing pad is used instead of the cutting plate to create an embossed panel rather than cutting out all of those beautiful hearts.  The ink blended hearts were die cut from the Altenew's Heart You die and the sentiment is from the Altenew + Hero Arts Bloom & Grow Stamp Set.  The sentiment really pops on the gray cardstock with the Altenew white embossing powder.  For added sparkle I colored each of the 3 hearts with my clear Wink of Stella pen.  Gorgeous iridescent drops complete the design.

My fourth card which is HAPPY BIRTHDAY, utilizes a cover die just like the previous card.  The Altenew  Dotted Scales Debossing Cover Die creates such a simple yet impactful background which makes the ink blended panel pop.  The ink blending was completed with Altenew's Baby Pink, Citrus Burst and Peach Perfect dye inks.  Since I only used a 1-3/4″ strip of the ink blended panel, I can use the remainder for another card in the future.   I decided to go for true impact by stamping the flower outline in black.  I love the Altenew Grateful Heart Stamp Set from which this flower is from.  The understated beauty of the sentiment provides simplicity.  I used the same gorgeous iridescent drops that I used on the previous card to provide visual interest.  As with the other cards in the set I mounted this panel onto an A2 size gray panel and then onto an A2 card base.

The final card in my feminine card set is so bright and cheery.  It is the perfect way to say THANKS to someone special.  I created a stencil using Altenew's Stacked Diamonds Cover Die.  I used the same blending inks as I did on the previous card, Baby Pink, Citrus Burst and Peach Perfect dye inks. I then stamped flowers from Altenew's Incredible Stamp Set with Versa Mark Ink and heat embossed it with Altenew Clear Embossing Powder.  I then blended Fuchsia over the embossed flowers for a bright and gorgeous effect.  I embellished the card with a Mega Thanks die cut in white for a stark contrast to the background.  Lastly, I added the same iridescent drops in a diagonal for bling on a relatively simple card.  The panel was then mounted to an A2 gray panel and then onto an A2 card base.

IMG_1290

Lastly, to package this beautiful feminine card set I used my recycled element as the base of the card holder.  I used the cardboard enclosure that my 12″x12″ Misti came in. I also used cardstock that I had in my paper stash.  

My card package is a refillable card dispenser so it can be reused once the 5 cards have been used.

From gray cardstock I cut 4 pieces of 1″x5.34″ strips.

From peach cardstock cut: 1 panel measuring 4-3/8″x5-3/4″, 1 panel measuring 5-3/4″x7″

From the recycled cardboard cut a 4-3/4″x6″ panel

1. On each of the 1″x5.35″ strips make a pencil mark at 3/4″, 1-7/8″, 3-7/8″ and 5-3/8″ on the right side and at 1-3/8″, 2-7/8″ and 4-3/8″ on the left side.

2. Place double sided adhesive on the cardboard panel and center it on the 5-3/4″x7″ peach cardstock panel. 

3. Miter each corner leaving about an 1/8″ between the miter and the corner of the cardboard panel.

4. Place double sided adhesive on the backside of the card board and then fold each side of the cardstock up and over to the back and adhere.

5. Score diagonal lines on the 1″x5.35″ gray strips.  The score lines will go from: 2.75″ on the left side marks to 1-7/8″ on the right and to 3-7/8″ on the right.  The other 2 score marks will go from 1-3/8″ on the left marks to 5-3/8″ on the right and from 4-3/8″ on the left to 3/8″ on the right.

6. Fold along the scored lines, and glue one to each of the corners as shown below to the panel measuring 4-3/8″x5-3/4.  The glue will give you the ability to get these aligned.

7. Apply double sided tape to the back of this panel and center it to the exposed cardboard.

8.  Now you can place your envelopes and cards into the dispenser.

This project was intensive but I enjoyed every second of it.  I truly hope these cards will provide inspiration and spark excitement and joy in your life and those you create for.  Wish me luck on moving on to Level 2.  As always, thank you for stopping by.

Jackie

5 thoughts on “AECP Level 1 Final Challenge – Feminine Card Set”

  1. Pingback: AECP Level 1 Final Challenge - Masculine Card Set -

Leave a Comment